22 Refreshing Cold Finger Food Appetizers for Your Next Party
Looking for some quick and tasty finger food appetizers that don’t require any cooking? You’ve come to the right spot! These 22 cold appetizers are not only easy to whip up, but they also make for perfect party snacks or casual get-togethers.
From classic veggie trays to delightful cheese platters, these bites are meant for sharing and enjoying with friends and family without breaking a sweat. You can mix and match flavors to suit your taste, and most of these dishes come together in no time at all.
Plus, there’s hardly any cleanup afterward! Whether you’re hosting a game night or simply hanging out, these finger foods will keep everyone happy and satisfied.
Each recipe provides the ingredients you’ll need, in both metric and imperial measurements, ensuring you have everything on hand. Step-by-step instructions will guide you through the simple process of assembling these delicious bites. So grab your favorite platter and let’s get these cold appetizers ready to go!
Hummus and Veggie Cups
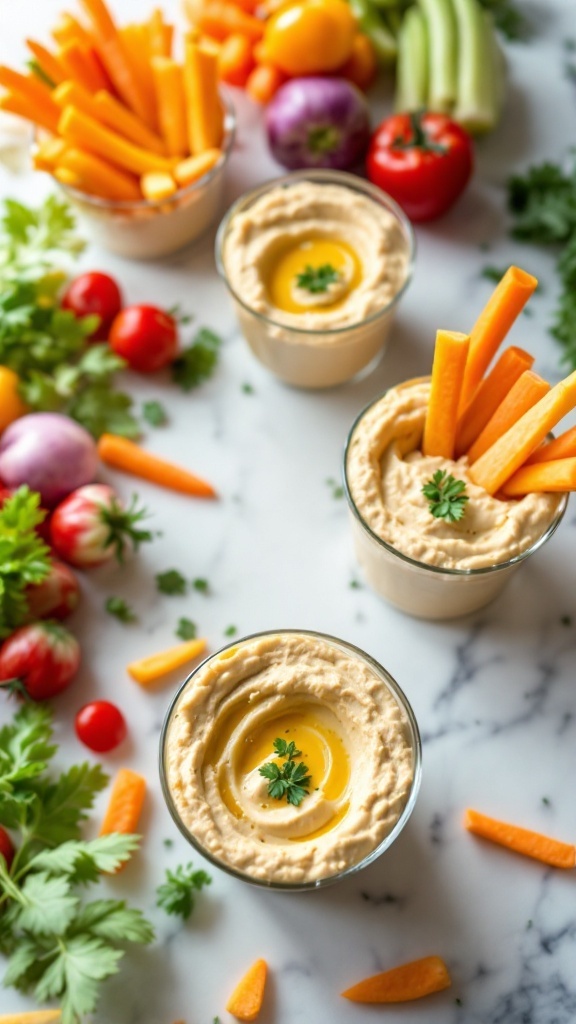
Hummus and veggie cups are a delightful way to serve up a healthy snack or appetizer that’s perfect for any gathering. The creamy hummus pairs beautifully with crisp, fresh vegetables like carrots, cucumbers, and bell peppers. Not only are these cups visually appealing, but they also deliver a satisfying crunch and a burst of flavor in every bite.
Making these cups is super simple! Just layer your favorite hummus in small cups and stick in a variety of colorful veggie sticks. They’re not only healthy but also quick to prepare, making them a great option when you need finger food in a hurry. Plus, they look great on any table!
Ingredients
- 1 cup hummus (store-bought or homemade)
- 2 large carrots, cut into sticks
- 1 cucumber, cut into sticks
- 1 bell pepper, cut into strips
- 1 cup cherry tomatoes
- Fresh parsley for garnish (optional)
Instructions
- Prepare the Veggies: Wash and cut the vegetables into sticks or strips.
- Assemble the Cups: In individual cups or small glasses, add a generous layer of hummus at the bottom.
- Add the Veggies: Stand the veggie sticks upright in the hummus, arranging them in a colorful manner.
- Garnish: Add a cherry tomato on the side and optionally sprinkle fresh parsley on top for a pop of color.
- Serve: Enjoy immediately or chill in the fridge until ready to serve.
Deviled Eggs with Spicy Mustard

Deviled eggs are a classic appetizer that never goes out of style. With the addition of spicy mustard, these eggs take on a delightful kick that makes them stand out on any platter. They’re creamy, flavorful, and have just the right amount of heat to keep your taste buds tingling. Plus, they are simple to make, making them a go-to choice for gatherings or casual snacks.
These deviled eggs are not only quick to prepare but also offer a satisfying bite that guests will love. The combination of mustard and the egg yolk filling creates a rich and zesty flavor profile, perfect for those who enjoy a touch of spice. Garnished with a sprinkle of paprika, they look as good as they taste!
Ingredients
- 6 large eggs
- 3 tablespoons mayonnaise
- 1 teaspoon spicy mustard
- 1 teaspoon Dijon mustard
- Salt and pepper, to taste
- Paprika, for garnish
- Chopped fresh parsley, for garnish
Instructions
- Boil the Eggs: Place the eggs in a pot and cover them with cold water. Bring to a boil, then cover, remove from heat, and let sit for 12 minutes.
- Cool and Peel: Transfer the eggs to an ice bath for 5 minutes. Once cooled, gently crack the shells and peel them.
- Prepare the Filling: Slice the eggs in half lengthwise, remove the yolks, and place them in a bowl. Mash the yolks with a fork.
- Add Ingredients: Mix in mayonnaise, spicy mustard, Dijon mustard, salt, and pepper until smooth.
- Fill the Egg Whites: Spoon or pipe the yolk mixture back into the egg whites.
- Garnish: Sprinkle with paprika and add chopped parsley before serving.
Smoked Salmon and Cream Cheese Bites

Smoked salmon and cream cheese bites are a delightful combination of flavors that are both light and satisfying. The creaminess of the cheese pairs beautifully with the smoky, savory taste of the salmon, offering a refreshing bite that’s perfect for any gathering. These appetizers are incredibly easy to whip up and can be prepared in just a few minutes, making them a go-to option for busy hosts.
With a crunchy base, creamy topping, and a garnish of fresh herbs, these bites are visually appealing as well. They are perfect for parties, brunches, or even simple gatherings. Plus, they can be customized with various toppings or served on different bases like crackers or bread, allowing for creativity in presentation. Your guests will surely enjoy them!
Ingredients
- 200g smoked salmon
- 100g cream cheese
- 1 tablespoon chopped fresh dill
- 1 teaspoon lemon juice
- 1/2 teaspoon black pepper
- 8 slices of rye bread (or your choice)
- Lemon wedges for garnish
Instructions
- In a bowl, mix the cream cheese, chopped dill, lemon juice, and black pepper until well combined.
- Spread a generous layer of the cream cheese mixture over each slice of rye bread.
- Top each slice with a few pieces of smoked salmon.
- Garnish with additional dill and a squeeze of lemon juice.
- Slice the bread into bite-sized pieces and serve immediately.
Caprese Skewers with Balsamic Glaze
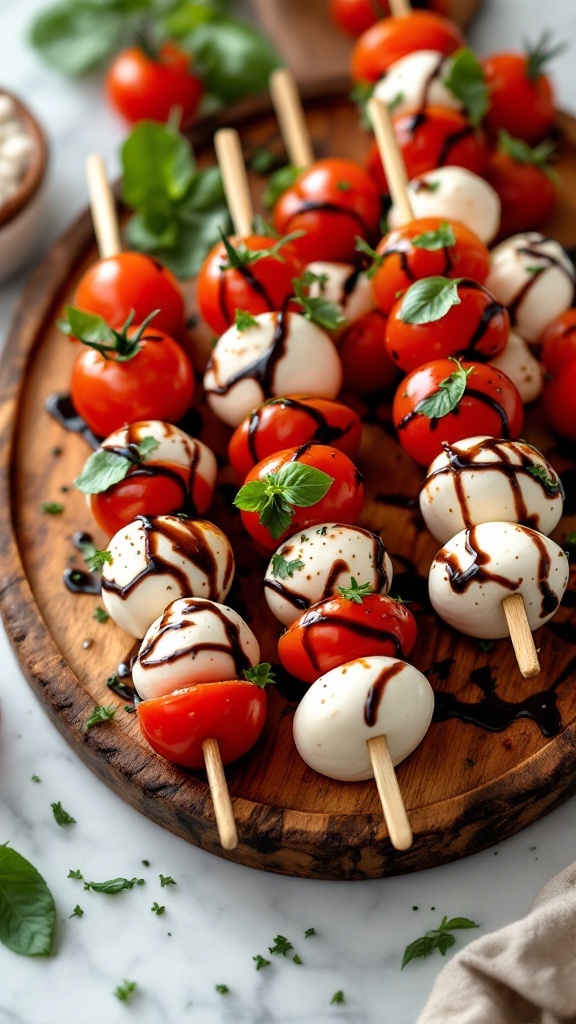
Caprese skewers are a delightful twist on the classic Caprese salad. They combine juicy cherry tomatoes, creamy mozzarella balls, and fresh basil leaves, all drizzled with a tangy balsamic glaze. This dish is not only visually appealing but also offers a refreshing burst of flavors that perfectly balance sweetness and acidity.
Making these skewers is super simple and quick, making them an ideal choice for gatherings or snack time at home. Just a few ingredients come together to create a finger food that everyone will enjoy, whether you’re serving a crowd or just indulging yourself.
Ingredients
- 400g cherry tomatoes
- 250g mozzarella balls
- Fresh basil leaves
- 60ml balsamic glaze
- Salt and pepper to taste
- Wooden skewers
Instructions
- Prepare the Skewers: Take a wooden skewer and thread on a cherry tomato, followed by a mozzarella ball, and then a basil leaf. Repeat until the skewer is filled, leaving a little space at the ends.
- Season: Once all the skewers are assembled, drizzle them with balsamic glaze. Sprinkle a pinch of salt and pepper over the top for added flavor.
- Serve: Arrange the skewers on a platter and enjoy immediately or refrigerate until ready to serve. These skewers are best served fresh!
Antipasto Skewers with Olives and Cheese
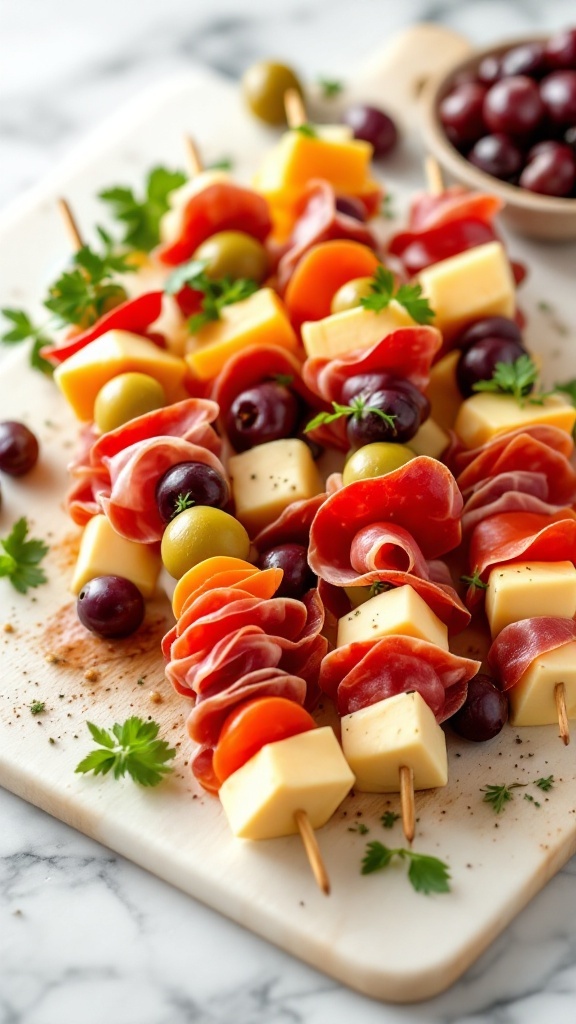
Antipasto skewers are a simple and delightful way to enjoy a variety of flavors all at once. These skewers combine savory cheeses, cured meats, and olives for a delicious bite-sized treat that’s perfect for parties or casual get-togethers. Each skewer is not only visually appealing but also offers a burst of flavor that pairs well with any beverage.
Making these skewers is easy and requires minimal prep work. Just gather your ingredients, assemble them on skewers, and they’re ready to serve! Whether you’re hosting a gathering or simply want a tasty snack, these antipasto skewers are a crowd-pleaser.
Ingredients
- 200g cheese (such as cheddar or mozzarella), cubed
- 100g cured meats (like salami or prosciutto), sliced
- 150g green olives
- 150g black olives
- 1 cup cherry tomatoes
- Fresh parsley for garnish
- Skewers (wooden or metal)
Instructions
- Prepare all your ingredients by cubing the cheese, slicing the cured meats, and washing the olives and tomatoes.
- Take a skewer and start threading ingredients onto it. You can alternate between cheese, cured meats, olives, and cherry tomatoes as you like.
- Once all ingredients are assembled on the skewers, arrange them neatly on a serving platter.
- Garnish with fresh parsley for a pop of color and flavor.
- Serve immediately, or refrigerate until you’re ready to enjoy!
Mini Cucumber Sandwiches with Cream Cheese

Mini cucumber sandwiches with cream cheese are a delightful finger food that brings a refreshing crunch and creamy texture to your appetizer spread. These little bites are light, easy to prepare, and perfect for any gathering. The crispness of the cucumber pairs beautifully with the smooth cream cheese, making each bite satisfying yet not too heavy.
These sandwiches also offer a great opportunity to customize flavors. You can add herbs, spices, or even some smoked salmon to elevate the taste. They’re not only simple to make, but they also look inviting on any platter. You’ll have your guests reaching for more in no time!
Ingredients
- 1 large cucumber
- 200 grams (7 oz) cream cheese, softened
- 1 tablespoon fresh dill, chopped
- 1 tablespoon fresh chives, chopped
- 1 teaspoon lemon juice
- 8 slices of white or whole grain bread
- Salt and pepper to taste
Instructions
- Prepare the Herb Cream Cheese: In a mixing bowl, combine softened cream cheese, dill, chives, lemon juice, salt, and pepper. Mix until everything is well incorporated.
- Slice the Cucumber: Wash the cucumber and slice it thinly using a sharp knife or a mandoline for even pieces.
- Cut the Bread: Use a round cookie cutter to cut the bread into circles. You can also cut them into squares or triangles if you prefer.
- Assemble the Sandwiches: Spread a layer of the herb cream cheese on one side of each bread circle. Place a slice of cucumber on half of the cream cheese-covered slices, and then top with another slice of cream cheese-covered bread.
- Chill and Serve: Arrange the sandwiches on a platter and refrigerate them for about 15-20 minutes before serving to firm them up. Enjoy!
Fruit and Cheese Platter

A fruit and cheese platter is a delightful combination that pleases the palate with its mix of flavors and textures. The creaminess of cheese pairs beautifully with the sweetness and juiciness of fresh fruit, making it a refreshing appetizer for any gathering. This recipe is not only easy to put together but also allows for endless customization based on your favorite cheeses and seasonal fruits.
This platter is perfect for casual get-togethers or elegant parties alike. Simply arrange a selection of cheeses alongside an array of vibrant fruits and nuts for a visually appealing and tasty finger food option. It’s simple to assemble and sure to impress your guests!
Ingredients
- 200g (7 oz) assorted cheeses (such as cheddar, brie, and goat cheese)
- 150g (5 oz) assorted fruits (like strawberries, grapes, and blueberries)
- 100g (3.5 oz) mixed nuts (such as almonds and walnuts)
- 150g (5 oz) dried fruit (such as apricots and cranberries)
- Fresh mint leaves for garnish
- Honey or fig jam for drizzling (optional)
Instructions
- Choose a serving board or platter to arrange your ingredients.
- Cut the cheeses into various shapes and sizes and place them on the board.
- Wash and prepare the fruits, then add them around the cheeses.
- Fill in any gaps with mixed nuts and dried fruits for a pop of color and texture.
- Garnish with fresh mint leaves and drizzle with honey or fig jam if desired.
- Serve immediately and enjoy with your guests!
Bruschetta with Tomato and Basil

Bruschetta with tomato and basil is a delightful appetizer that brings a taste of Italy right to your table. This simple dish combines toasted bread with fresh, juicy tomatoes and fragrant basil, making it a refreshing bite that’s perfect for any occasion. The savory flavors are elevated with a drizzle of olive oil, providing a satisfying crunch and a burst of freshness in every bite.
Easy to make and visually appealing, bruschetta is not only quick to prepare but also allows for creativity. You can use different types of bread, add garlic for an extra kick, or even mix in other toppings like mozzarella or balsamic glaze. It’s an ideal finger food for gatherings, ensuring your guests enjoy a tasty treat without any fuss.
Ingredients
- 4 slices of crusty bread (about 1/2 inch thick)
- 2 cups fresh tomatoes, diced
- 1/4 cup fresh basil leaves, chopped
- 2 tablespoons extra virgin olive oil
- 1 clove garlic, minced
- Salt and pepper to taste
- Optional: balsamic glaze for drizzling
Instructions
- Toast the Bread: Preheat your oven to 400°F (200°C). Place the slices of bread on a baking sheet and toast them for 5-7 minutes, or until golden brown and crisp.
- Prepare the Topping: In a bowl, combine the diced tomatoes, chopped basil, minced garlic, olive oil, salt, and pepper. Mix well to combine the flavors.
- Assemble the Bruschetta: Once the bread is toasted, remove it from the oven and spoon the tomato mixture generously on each slice.
- Serve: Drizzle with balsamic glaze if desired, and enjoy your bruschetta while it’s fresh!
Savory Spinach and Feta Pinwheels
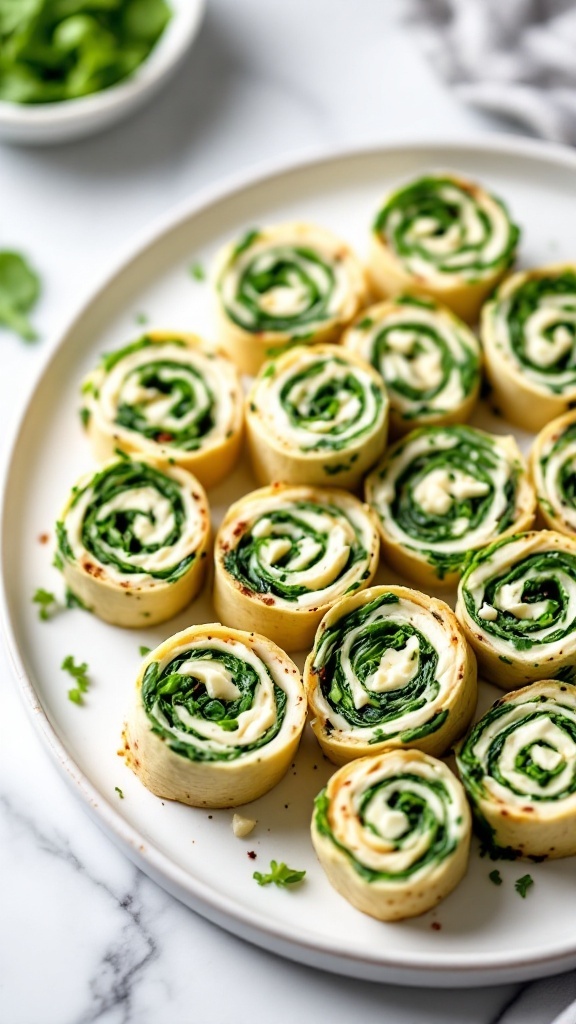
Savory Spinach and Feta Pinwheels are a delightful and simple appetizer that brings together the earthy flavor of spinach and the creamy tang of feta cheese. These bite-sized treats are perfect for any gathering, offering a fresh taste in every roll. The combination of ingredients makes them not only delicious but also visually appealing, adding a pop of color to your appetizer spread.
Making these pinwheels is a breeze! With just a few ingredients and minimal preparation, you can whip up a batch in no time. They’re great to serve at parties or even as a snack for yourself. Plus, they can be made ahead of time and stored in the fridge until you’re ready to serve. Enjoy them chilled, and watch as they disappear from the platter!
Ingredients
- 200g spinach, fresh
- 150g feta cheese, crumbled
- 250g cream cheese, softened
- 4 large tortillas (whole wheat or regular)
- 1 clove garlic, minced
- 1 tablespoon olive oil
- Salt and pepper to taste
Instructions
- Prepare the Filling: In a bowl, mix the spinach, feta cheese, cream cheese, minced garlic, olive oil, salt, and pepper until well combined.
- Assemble the Pinwheels: Lay a tortilla flat and spread a generous layer of the filling evenly over it.
- Roll it Up: Starting from one edge, tightly roll the tortilla. Repeat with the remaining tortillas and filling.
- Chill: Wrap the rolled tortillas in plastic wrap and refrigerate for at least 30 minutes to firm up.
- Slice and Serve: Remove from the fridge, unwrap, and slice the rolls into bite-sized pinwheels. Arrange on a platter and enjoy!
Cheesy Bacon Stuffed Mini Peppers
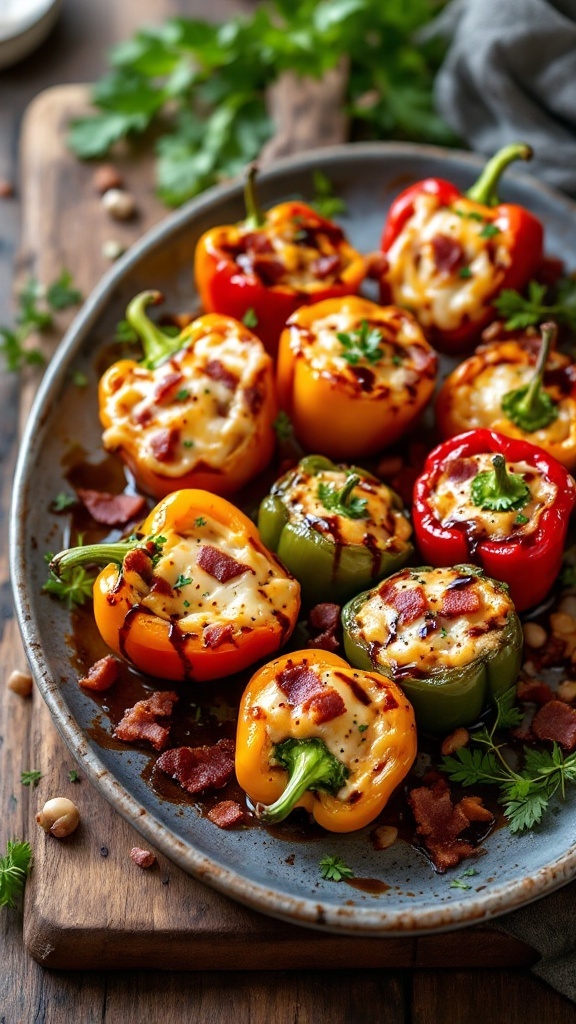
Cheesy Bacon Stuffed Mini Peppers are a delightful appetizer that perfectly combines vibrant flavors with a satisfying crunch. These little bites are stuffed with a creamy cheese mixture and crispy bacon, offering a savory experience that’s hard to resist. Plus, they are super easy to make, making them a go-to option for any gathering.
Whether you’re hosting a party or just want a tasty snack, these stuffed peppers are great finger food. Their colorful presentation adds a festive touch, and the combination of cheese and bacon is always a hit. Let’s dive into how you can whip up this tasty treat!
Ingredients
- 12 mini sweet peppers
- 1 cup cream cheese, softened
- 1 cup shredded cheddar cheese
- 1/2 cup cooked bacon, crumbled
- 1 tablespoon garlic powder
- 1/2 teaspoon black pepper
- Fresh parsley for garnish
Instructions
- Preheat your oven to 375°F (190°C) and line a baking sheet with parchment paper.
- In a large bowl, mix the softened cream cheese, shredded cheddar, crumbled bacon, garlic powder, and black pepper until well combined.
- Slice the mini peppers in half lengthwise and remove the seeds. Place them cut-side up on the prepared baking sheet.
- Stuff each pepper half with the cheese and bacon mixture, filling them generously.
- Bake in the preheated oven for about 15-20 minutes, or until the cheese is melted and bubbly.
- Remove from the oven and let cool slightly. Garnish with fresh parsley before serving.
Ham And Cheese Deviled Eggs

Ham and cheese deviled eggs are a delightful twist on the classic appetizer. They combine the creamy richness of egg yolks with savory ham and melted cheese, creating a flavor combination that’s both satisfying and tasty. These bite-sized treats are not only delicious but also simple to prepare, making them perfect for any gathering or snack time.
Each bite offers a creamy texture with a hint of smokiness from the ham and a cheesy finish that adds depth. Plus, they can be made in advance, allowing you to enjoy your time with guests without the stress of last-minute cooking. Whether you’re hosting a party or just looking for a fun snack, these deviled eggs are sure to be a hit!
Ingredients
- 6 large eggs
- 1/4 cup mayonnaise
- 1 teaspoon Dijon mustard
- 1/4 teaspoon salt
- 1/4 teaspoon black pepper
- 1/2 cup diced ham
- 1/2 cup shredded cheddar cheese
- Fresh parsley, for garnish
Instructions
- Hard-Boil the Eggs: Place the eggs in a saucepan and cover with cold water. Bring to a boil, then remove from heat, cover, and let sit for 12 minutes. Transfer the eggs to an ice bath to cool.
- Prepare the Filling: Once cooled, peel the eggs and slice them in half lengthwise. Remove the yolks and place them in a bowl. Mash the yolks with mayonnaise, Dijon mustard, salt, and pepper until smooth.
- Add Ham and Cheese: Gently fold in the diced ham and shredded cheddar cheese into the yolk mixture.
- Fill the Egg Whites: Spoon or pipe the yolk mixture back into the egg whites. Sprinkle with fresh parsley for garnish.
- Serve: Arrange the deviled eggs on a platter and serve chilled or at room temperature.
Cream Cheese Pickle Ham Rolls

Cream Cheese Pickle Ham Rolls are a delightful and easy appetizer that packs a punch of flavor. With a creamy texture from the cheese and a crisp bite from the pickles, these rolls are sure to be a hit at any gathering.
Not only are they simple to prepare, but they also offer a wonderful combination of savory and tangy tastes. Perfect for parties or as a light snack, these rolls are a fun way to enjoy your favorite ingredients in a bite-sized form. Here’s how to make them:
Ingredients
- 8 oz cream cheese, softened
- 8 oz sliced ham
- 1 cup dill pickle spears
- 1 tablespoon fresh herbs (like dill or parsley), chopped
- Toothpicks for securing
Instructions
- Spread the softened cream cheese evenly over each slice of ham.
- Place a dill pickle spear at one end of the ham slice.
- Roll the ham around the pickle tightly and secure it with a toothpick.
- Repeat for all slices, then slice each roll into bite-sized pieces.
- Garnish with fresh herbs if desired, and serve chilled.
Mediterranean Feta Bites
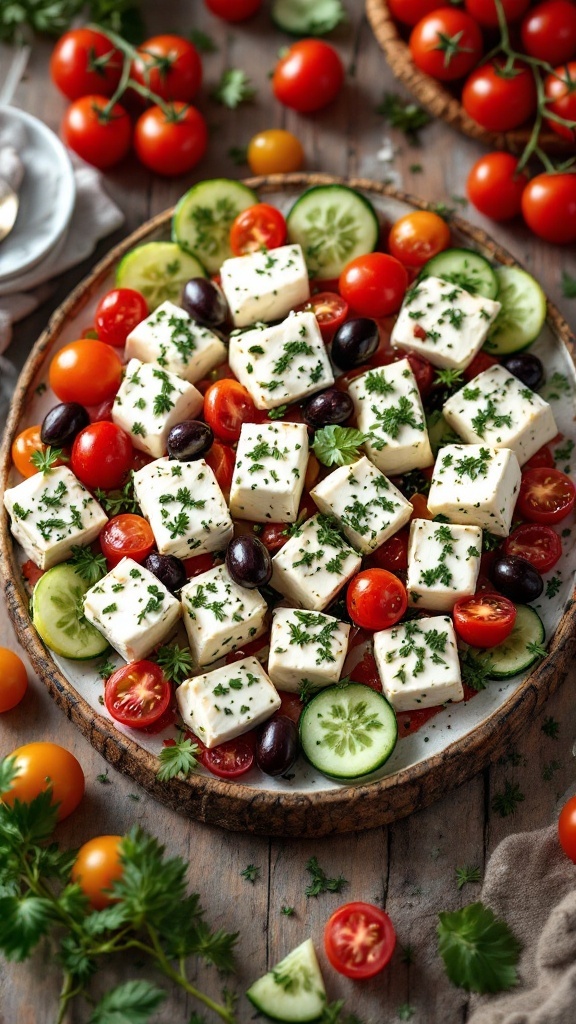
Mediterranean Feta Bites are a delightful combination of creamy feta cheese and fresh vegetables, making them a tasty and light appetizer. The salty tang of the feta is beautifully complemented by juicy tomatoes and crunchy cucumbers. This recipe is not only simple to prepare but also offers a refreshing burst of flavor that’s perfect for any gathering.
With just a few ingredients, you can whip up these bites in no time. They’re easy to serve, making them an ideal choice for parties or casual get-togethers. Plus, they look vibrant and colorful on the table, sure to catch everyone’s eye!
Ingredients
- 8 oz feta cheese, cubed
- 1 cup cherry tomatoes, halved
- 1 cup cucumber, sliced
- 1/2 cup black olives
- 2 tablespoons fresh parsley, chopped
- 1 tablespoon olive oil
- Salt and pepper to taste
Instructions
- Prepare the Vegetables: In a large serving dish, arrange the cubed feta, halved cherry tomatoes, cucumber slices, and black olives.
- Add Fresh Herbs: Sprinkle the chopped parsley on top for a fresh, vibrant flavor.
- Drizzle with Olive Oil: Lightly drizzle olive oil over the entire platter and season with salt and pepper to taste.
- Serve: Enjoy the Mediterranean Feta Bites as a refreshing appetizer or snack!
Cucumber Bites
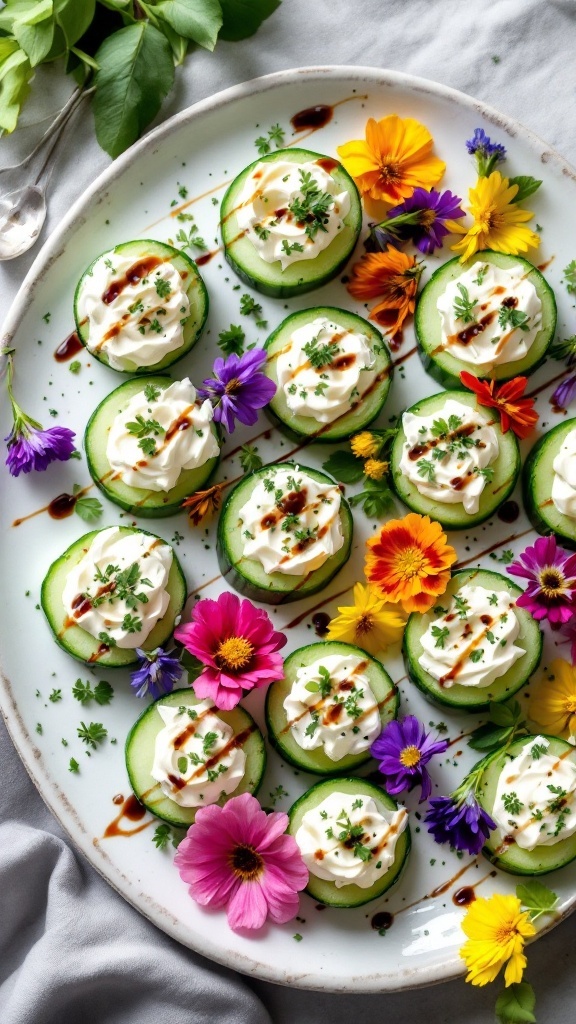
Cucumber bites are a delightful and refreshing appetizer that brings a burst of flavor in each bite. The cool crunch of cucumbers pairs wonderfully with creamy toppings, making them a satisfying finger food. These bites are not only simple to prepare, but they also look appealing, making them a perfect addition to any gathering.
With a balance of textures and flavors, these cucumber bites are sure to be a hit at your next event. They are light and can be made in various ways by experimenting with toppings like cream cheese, herbs, or even a dash of balsamic glaze. Whip them up quickly for a snack or serve them elegantly at a party!
Ingredients
- 1 large cucumber
- 1 cup cream cheese, softened
- 2 tablespoons fresh herbs (like dill or parsley), chopped
- 1 tablespoon lemon juice
- Salt and pepper to taste
- Balsamic glaze (optional, for drizzling)
Instructions
- Prepare the Cucumber: Wash the cucumber and slice it into thick rounds.
- Make the Filling: In a bowl, mix the softened cream cheese, chopped herbs, lemon juice, and season with salt and pepper.
- Assemble the Bites: Spoon the cream cheese mixture onto each cucumber slice, creating a small mound.
- Garnish and Serve: Drizzle with balsamic glaze if desired, and serve immediately for a fresh and tasty appetizer.
Bacon And Cheese Stuffed Celery
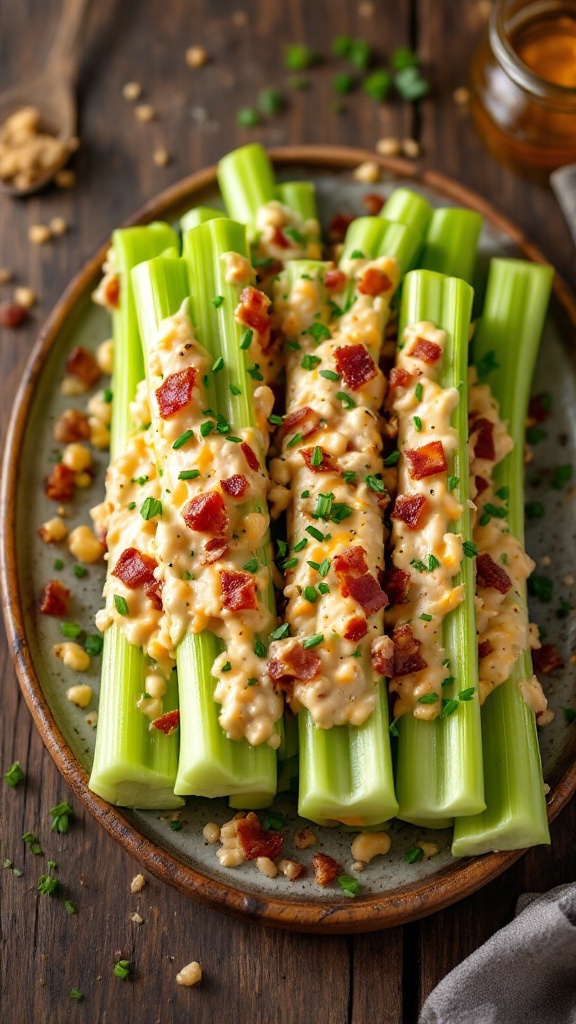
Bacon and cheese stuffed celery is a delightful appetizer that hits all the right notes. The crisp crunch of celery pairs perfectly with the creamy, savory cheese mixture and the salty bite of bacon, making every bite satisfying. Simple to whip up, this dish is perfect for gatherings or a casual snack.
With just a few ingredients, you can create a tasty finger food that everyone will enjoy. It’s a fun way to make celery exciting, especially for those who might not typically reach for this vegetable. Plus, it’s easy to prepare in advance, so you can spend more time enjoying your time with friends and family!
Ingredients
- 1 cup cream cheese, softened
- 1/2 cup shredded cheddar cheese
- 1/4 cup crumbled bacon
- 1 tablespoon chives, chopped
- 1/2 teaspoon garlic powder
- 4-5 celery stalks, cut into 3-inch pieces
- Salt and pepper to taste
Instructions
- In a mixing bowl, combine the softened cream cheese, shredded cheddar cheese, crumbled bacon, chopped chives, garlic powder, salt, and pepper. Mix well until all ingredients are thoroughly combined.
- Take each celery stalk and fill the center with the cheese and bacon mixture using a spoon or piping bag.
- Once all the celery pieces are filled, arrange them on a serving platter.
- Refrigerate for at least 30 minutes to allow the flavors to meld together.
- Serve chilled and enjoy your delicious bacon and cheese stuffed celery!
Pimento Cheese And Bacon Crostini

Pimento cheese and bacon crostini offer a delightful combination of creamy and smoky flavors. The rich pimento cheese spread paired with crispy bacon creates a savory bite that’s both satisfying and easy to prepare. This recipe is perfect for gatherings or a casual snack at home.
Making these crostini is straightforward. Just toast some bread, whip up the pimento cheese, and add crispy bacon on top for a crowd-pleasing appetizer that never disappoints.
Ingredients
- 1 French baguette, sliced into 1/2 inch pieces
- 1 cup pimento cheese
- 6 slices of bacon, cooked and crumbled
- Fresh parsley or chives for garnish
- Olive oil for brushing
Instructions
- Preheat the oven to 400°F (200°C). Arrange the baguette slices on a baking sheet and brush both sides lightly with olive oil.
- Bake the bread for about 10-12 minutes, or until golden and crispy.
- While the bread is toasting, prepare the pimento cheese if you’re making it from scratch. Mix together cream cheese, shredded cheddar cheese, pimentos, and a dash of cayenne pepper for a kick.
- Once the bread is done, let it cool slightly. Spread a generous amount of pimento cheese on each crostini.
- Top with crumbled bacon and garnish with fresh parsley or chives before serving.
Cajun Deviled Eggs With Shrimp

Cajun Deviled Eggs with Shrimp are a delightful twist on the classic appetizer that combines creamy, zesty filling with tender shrimp, bringing a burst of flavor to your gatherings. The Cajun seasoning adds a subtle kick, making each bite not just tasty but also exciting, all while remaining simple to whip up.
This recipe is perfect for those looking to impress without spending hours in the kitchen. With just a few ingredients and straightforward steps, you’ll have an elegant and delicious finger food that’s sure to be a hit at any party.
Ingredients
- 6 large eggs
- 1/4 cup mayonnaise
- 1 teaspoon Dijon mustard
- 1 teaspoon Cajun seasoning
- Salt and pepper to taste
- 12 medium shrimp, cooked and peeled
- Fresh parsley for garnish
Instructions
- Boil the Eggs: Place the eggs in a pot and cover them with water. Bring to a boil, then cover and remove from heat. Let them sit for about 12 minutes. Drain and cool in cold water before peeling.
- Prepare the Filling: Cut the eggs in half lengthwise and remove the yolks. In a mixing bowl, mash the yolks with mayonnaise, Dijon mustard, Cajun seasoning, salt, and pepper until smooth.
- Fill the Egg Whites: Spoon or pipe the yolk mixture back into the egg whites.
- Add Shrimp: Top each filled egg half with a shrimp and sprinkle with parsley for garnish.
- Serve: Arrange on a platter and enjoy your Cajun Deviled Eggs with Shrimp!
Cranberry Turkey Pinwheels

Cranberry Turkey Pinwheels are a delightful and easy-to-make appetizer that brings a burst of flavor in every bite. The combination of turkey, cream cheese, and tangy cranberry sauce creates a refreshing contrast that pairs beautifully with the soft tortilla wrap. These pinwheels not only taste fantastic but also look appealing, making them a great choice for parties or gatherings.
Making these pinwheels is simple and requires minimal ingredients. You can whip them up in no time, making them perfect for a last-minute snack or a planned event. Plus, they can be made ahead of time and stored in the refrigerator until you’re ready to serve. They are fun, colorful, and sure to impress your guests!
Ingredients
- 4 large flour tortillas
- 8 ounces cream cheese, softened
- 8 ounces sliced turkey breast
- 1 cup cranberry sauce
- 1/2 cup spinach leaves
- 1/2 teaspoon garlic powder
Instructions
- Prepare the Tortilla: Spread a layer of softened cream cheese evenly over each tortilla.
- Add the Filling: Layer the sliced turkey, spinach leaves, and a generous spoonful of cranberry sauce across the cream cheese.
- Season: Sprinkle garlic powder over the top to enhance the flavor.
- Roll It Up: Starting from one end, carefully roll the tortilla tightly to form a log.
- Slice: Using a sharp knife, slice the rolled tortilla into bite-sized pinwheels.
- Chill: Place the pinwheels on a platter and refrigerate for at least 30 minutes before serving to firm them up.
Guacamole and Tortilla Chips
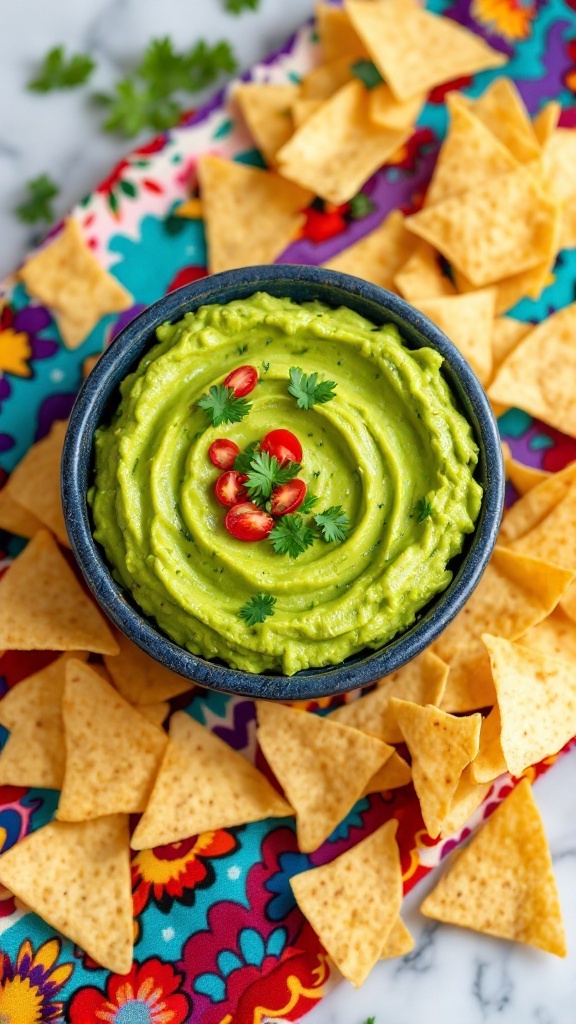
Guacamole paired with crispy tortilla chips is a classic finger food that’s not only tasty but also super easy to whip up. The creamy texture of the avocado, combined with a hint of lime and fresh cilantro, creates a delightful dip that’s perfect for gatherings or casual snacking.
This dish offers a refreshing taste that balances richness and zest, making it a crowd-pleaser. Plus, it takes just a few minutes to prepare, letting you spend more time enjoying your time with friends and family.
Ingredients
- 3 ripe avocados
- 1 lime, juiced
- 1 small onion, diced
- 2 tomatoes, diced
- 1-2 cloves garlic, minced
- 1/4 cup fresh cilantro, chopped
- Salt and pepper, to taste
- 200g (about 7 oz) tortilla chips
Instructions
- Prepare the Avocado: Cut the avocados in half, remove the pits, and scoop the flesh into a mixing bowl.
- Mash and Mix: Use a fork to mash the avocado to your desired consistency. Stir in lime juice, diced onion, tomatoes, garlic, and cilantro.
- Season: Add salt and pepper to taste, mixing well to combine all the flavors.
- Serve: Transfer the guacamole to a serving bowl and arrange the tortilla chips around it for easy dipping.
- Enjoy: Grab a chip, scoop up some guacamole, and enjoy your tasty appetizer!
Chicken Salad Lettuce Wraps

Chicken salad lettuce wraps are a light and refreshing option for appetizer lovers. They combine tender chicken with crunchy veggies, all wrapped in crisp lettuce. The flavors come together beautifully, making each bite a balance of savory and fresh.
Not only are they easy to whip up, but they also provide a healthy alternative to heavier snacks. Perfect for gatherings or a quick snack at home, these wraps are sure to impress without requiring much effort!
Ingredients
- 2 cups cooked chicken, chopped
- 1/2 cup Greek yogurt
- 1/4 cup mayonnaise
- 1 tablespoon Dijon mustard
- 1/2 cup cherry tomatoes, halved
- 1/4 cup red onion, finely chopped
- 1/4 cup celery, diced
- 2 tablespoons fresh parsley, chopped
- Salt and pepper to taste
- 8 large lettuce leaves (like romaine or butter lettuce)
Instructions
- Mix Ingredients: In a large bowl, combine the chopped chicken, Greek yogurt, mayonnaise, and Dijon mustard. Stir well to combine.
- Add Veggies: Gently fold in the cherry tomatoes, red onion, celery, and parsley. Season with salt and pepper to taste.
- Prepare Lettuce: Carefully separate the lettuce leaves and rinse them under cold water. Pat them dry with a paper towel.
- Assemble Wraps: Spoon the chicken salad mixture into the center of each lettuce leaf.
- Serve: Enjoy immediately, or chill in the refrigerator for a refreshing snack later!
Pimento Cheese Spread with Crackers
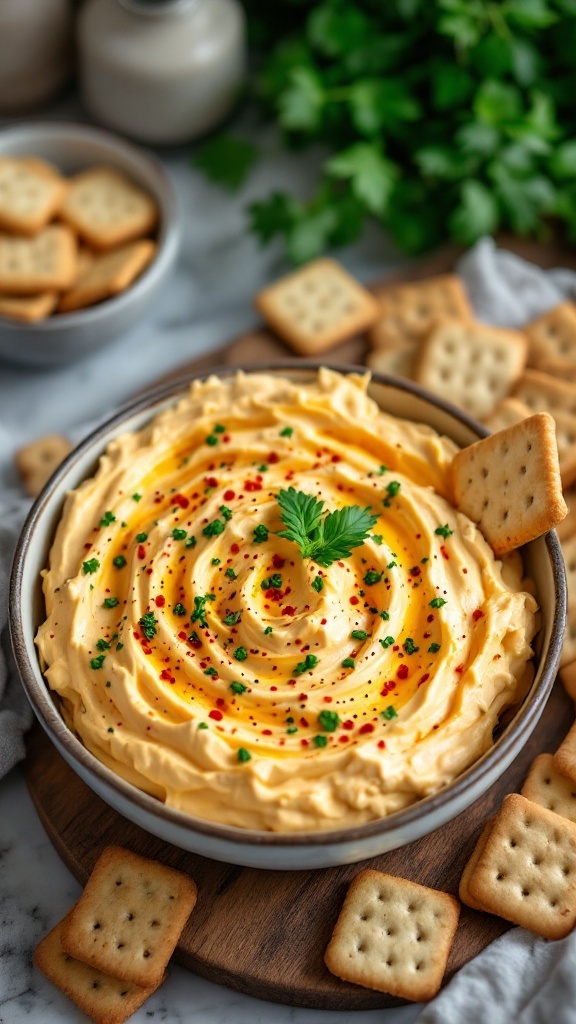
Pimento cheese spread is a classic Southern dish that’s creamy, cheesy, and packed with flavor. It combines sharp cheddar cheese with tangy pimentos and spices, creating a delightful dip that pairs perfectly with crackers. This spread is not only delicious but also super simple to make, making it an ideal choice for casual gatherings or finger food appetizers.
The richness of the cheese and the slight kick from the pimentos will have your guests reaching for more. Serve it with an assortment of crackers for a fun and easy appetizer that requires minimal prep while delivering maximum taste. Whether you’re hosting a party or just looking for a tasty snack, pimento cheese spread won’t disappoint!
Ingredients
- 240 grams (8 oz) sharp cheddar cheese, shredded
- 120 grams (4 oz) cream cheese, softened
- 1/2 cup (75 grams) pimentos, diced
- 1 tablespoon mayonnaise
- 1 teaspoon garlic powder
- 1 teaspoon onion powder
- 1/2 teaspoon cayenne pepper (optional)
- Salt and pepper to taste
- Crackers for serving
Instructions
- In a mixing bowl, combine the shredded cheddar cheese and softened cream cheese. Mix until well combined.
- Add the diced pimentos, mayonnaise, garlic powder, onion powder, and cayenne pepper (if using). Stir until all ingredients are evenly distributed.
- Season with salt and pepper to taste, adjusting according to your preference.
- Transfer the pimento cheese spread to a serving bowl and chill in the refrigerator for at least 30 minutes before serving.
- Serve with your favorite crackers and enjoy!
Marinated Mozzarella Balls with Herbs

Marinated mozzarella balls with herbs are a delightful and easy-to-make appetizer that packs a burst of flavor in every bite. These little cheese morsels are soaked in a mixture of olive oil and fresh herbs, allowing them to absorb all the deliciousness around them. They have a creamy texture and a fresh taste, making them a great addition to any gathering.
This recipe is simple enough for anyone to whip up, taking only a few minutes to prepare. They can be served on their own or as part of a larger cheese platter, and they pair wonderfully with crusty bread or crackers. Perfect for parties, picnics, or even just a cozy night in!
Ingredients
- 250g (9 oz) mozzarella balls
- 120ml (1/2 cup) extra virgin olive oil
- 2 cloves garlic, minced
- 1 teaspoon dried oregano
- 1 teaspoon dried basil
- 1/2 teaspoon red pepper flakes (optional)
- Salt and pepper to taste
- Fresh basil leaves, for garnish
Instructions
- In a bowl, combine the olive oil, minced garlic, oregano, basil, red pepper flakes, salt, and pepper.
- Add the mozzarella balls to the bowl, ensuring they are fully submerged in the marinade.
- Cover the bowl and let it marinate in the fridge for at least 30 minutes to allow the flavors to meld.
- Before serving, give the mozzarella a gentle toss and garnish with fresh basil leaves.
- Enjoy with toothpicks or on a platter with your favorite bread or crackers!
More Like This
— SAVE THIS POST —
Did you like this post? If you liked this post, don’t hesitate to share it!
Want to save this post? You can pin the following images on pinterest to save this post.
We are Mary and Eric, the founders of Be Right Back, a blog dedicated to romance around the globe and at home.
We are Mary and Eric, the founders of Be Right Back, a blog dedicated to romance around the globe and at home. With over 10 years of experience in dating and traveling to romantic places, we share our favorite date ideas and romantic destinations to help couples level up their relationships. Having lived in and traveled through the USA, we also share our favourite things to do in the States.
With 70,000 monthly readers and 16,000 followers on social media, Be Right Back is your go-to resource for romantic trip ideas and couple activities at home and abroad.